Case Study: Cleaning Slate
We receive so many comments on the subject of cleaning slate that we invited a stone cleaning professional and friend of ours, Andrew Titmuss of Posh Stone Floors, to take us through one of his jobs.
Below you can see the job he was faced with, a nice multi-coloured, riven (naturally textured) slate floor which, over time has accumulated a lot of general dirt.
The customer brought Andrew in to advise with a view to cleaning and sealing the floor.
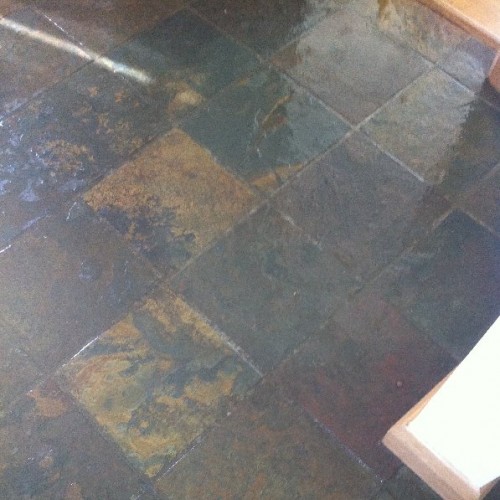
Floor before cleaning
Like most professionals, Andrew insisted on a test clean first. So he set about deep cleaning the area around one tile and paid particular attention to the grout joints.
This is what he left for the customer to view. The results were so startling that the customer’s initial reaction was that he must have painted the grout joints.
However as he explained, they were just ingrained with dirt, and as in so many cases not just dirt, but several years worth of detergent residue that had built up, slowly over time, so the customer did not really notice the gradual decline in appearance.
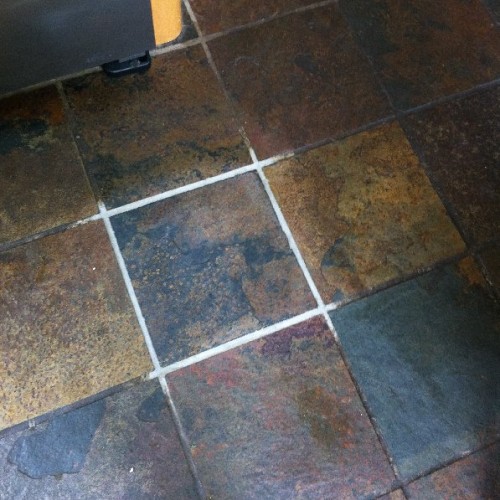
Test area – joints and tile cleaned
Obviously, he got the job and proceeded to make the rest of the floor look like the test area. Below Andrew sets out his standard procedure – a procedure which regular readers of our blog will surely recognize:
1. Pre wet the floor
2. Apply Alkaline cleaner with a bit of abrasive cream cleaner.
3. Leave the cleaner to dwell on the floor making sure it does not dry.
4. Agitate the floor with a rotary scrubber, scrubber grout joints with a grout brush.
5. Leave to dwell, then wet vac up cleaning solution.
6. Rinse the floor with clean water making sure all the cleaner has been removed.
7. Check the floor to make sure no bits have been missed.
8. Leave floor to dry (over night) the apply sealer.
Adding a couple of points:
1. Pre wetting the floor – this partly wets-out the tile and definitely the grout joint, preventing all the detergent from just being absorbed and therefore keeping it at the surface, where it is needed.
2. Adding a micro-abrasive cream cleaner (such as Microscrub) is an option, that can boost the cleaning power of the alkaline, and help to physically scrub the dirt, especially useful on textured surfaces.
3. Dwell time is variable but you should look for about 10 to 15 minutes. Keeping it wet in that time by simply adding more cleaning solution. A watch point here is to be careful about all this water when working near water-sensitive surfaces such as kitchen unit end panels (often made from highly absorbent mdf) and adjacent wood floors etc.
4. Points 4 and 5 are self-explanatory.
5. Rinsing the floor is so important, yet so often overlooked, or even misunderstood: we still frequently come across people who interpret rinsing, as simply removing the dirty water (point # 5 above) that is Extraction not ‘Rinsing’. Rinsing involves adding new, clean water to the floor, with a clean mop, lightly agitating again then extracting, again. – Don’t overlook this.
It is always a good idea to dry the floor after with an old towel or similar, it helps speed up complete drying, so you can seal the floor if required a little sooner, plus it also helps to remove any remaining traces of detergent residue and dirt and eliminates the formation of water marks (especially important on polished surfaces).
If all this seems a little like hard work – well, that is why professionals like Andrew offer this as a service. Remember though that this is an intensive, periodic deep clean – not a regular weekly wash.
Notice also, that very often it is the grout joints that make a dirty floor look really terrible, more often than not, bring the grout joints back to a clean condition will make the floor look like new again.
Store
View our range of stonecare maintenance products
Still not sure?
Ask us...
Use our online form to send us a photo and/or a description of the problem and we will advise and help as far as we can.